Introduction
This section gives more information on the Lizard API, which can be accessed via “{your_organisation}.lizard.net/api/v4/”. The Lizard API can be used to retrieve data from or send data to the datawarehouse. The following topics are documented here:
Note
You can find the Lizard API here: {your_organisation}.lizard.net/api/v4/, for example https://demo.lizard.net/api/v4/.
What is an API?
API stands for Application Programming Interface. The Lizard API enables users to communicate with the data that is stored within the datawarehouse. The communication between you and the Lizard API happens through a request. There are two main ways to send a request to the Lizard API:
From your browser
From an environment with a programming language that supports requests, such as a Python script
Basic use API
In this section we explain how to communicate with the Lizard API by making requests.
A request consists of an endpoint (required) and query parameters (optional).
An endpoint is a digital location that is connected to a specific resource, such as for example locations.
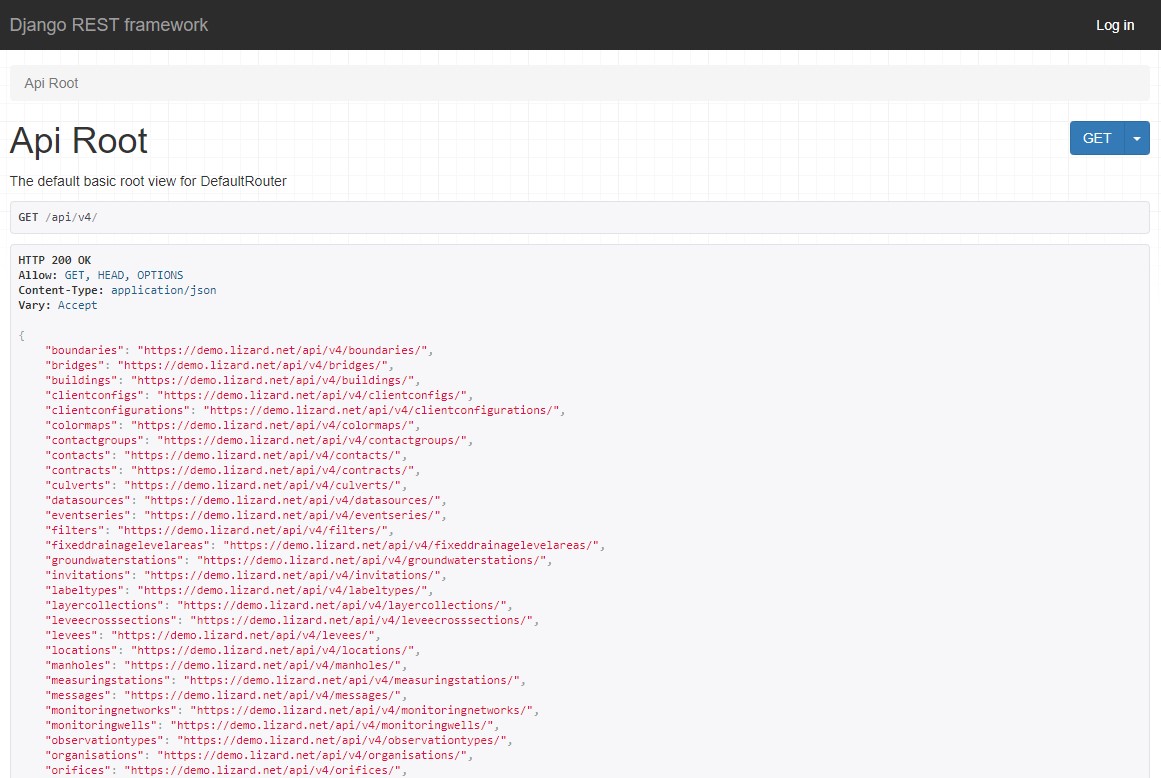
All possible endpoints are shown at the API root: {your_organisation}.lizard.net/api/v4/.
Query parameters are filters that you can use, for example to filter on the location name or code.
This example consists of an API root (demo.lizard.net/api/v4/) and an endpoint (locations).
The request asks Lizard to show all locations that you have access to, including their metadata.
If you want to look for specific locations, you can add query parameters.
Each endpoint page shows which query parameters can be used.
The image below shows the query parameters available for the endpoint locations.

In the case of the endpoint locations you can for example filter on name and code.
A request with query parameters should follow this structure:
{endpoint url}/?{query parameter}={your filter}
3201_PS2:{endpoint url}/?{query parameter 1}={filter 1}&{query parameter 2}={filter 2}3201_PS2 (query parameter 1) and a name that starts with inlaat (query parameter 2):Versions
The current stable version of the Lizard API is v4.
The previous version v3 is deprecated since 2023. Any use of v3 in scripts or applications should be reimplemented in API v4. If you run into problems converting API v3 into v4, please contact us through the Self Service Portal.
Data uploads
We support multiple types of data uploads. Data can be uploaded manually, via the data management interface, or you can set up real-time data connections using the API. We can also provide support on either manual or automatic data uploads. This section deals with the data upload through the API.
Note
Please note that Lizard assumes the data to be in UTC
Rasters
Rasters in Lizard consist of:
Raster Sources that contain the raster data
Raster Layers that represent the visualisation
Raster data must therefore be uploaded to a Raster Source.
The Raster Source must exist in Lizard to be able to upload raster data.
The endpoint for raster data is {your_organisation}.lizard.net/api/v4/rastersources/{your_raster_uuid}/data/.
Requirements
Your raster data has to be in the format of a single band, georeferenced TIFF (GeoTIFF), with the following requirements:
Geotiff should have valid projection including transformation (EPSG code). All projections supported by proj4 are supported.
Geotiff should have a NODATA value.
Geotiff should be single band. RGB or multi-band is not supported.
Temporal raster datasets with multiple timesteps should be supplied with a single geotiff per timestamp
Warning
It is not possible to directly upload a NetCDF file to Lizard. They have to be seperated into individual geotiffs.
Upload
Below you find an example of how to upload a temporal geotiff in Python:
import os
import shutil
import requests
import json
import time
from datetime import datetime, timedelta

srcdir = r""
tgtdir = r"" #Files are transfered here after being uploaded
base_url = 'https://demo.lizard.net/api/v4/rastersources/{}/data/' #Fill in rastersource__uuid
api_key = '' #Fill in personal API key of supplier account

headers= {
        "username": "__key__",
        "password": "{}".format(api_key)
        }

file_id = 10000001 #Random counter

for filename in os.listdir(srcdir):
        print(filename)
        f = open(os.path.join(srcdir, filename), 'rb')
        files = {'file': f}
        payload = {'file_id': file_id,
                           'timestamp': '{}'.format(
                                   datetime.strptime(filename.split('.')[0],
                                                                         '%Y%m%dT%H%MZ'
                                                                         ).strftime('%Y-%m-%dT%H:%M:00Z')
                                   )
                           }
        #The upload request could be put in a try/except like the result check, to prevent disruptions
        res = requests.post(url=base_url,
                                                files=files,
                                                data=payload,
                                                headers=headers
                                                )
        f.close()
        #Check task result to know when to upload the next
        task_url= res.json()['url']
        processed = False
        while not processed:
                time.sleep(4) #Can be adjusted based on average processing time per file
                try:
                        task_res= requests.get(url=task_url,
                                                                   headers=headers
                                                                   )
                        if task_res.json()['status'] == 'SUCCESS':
                                processed = True
                except:
                        print('Error occurred')
        shutil.move(os.path.join(srcdir, filename),
                                os.path.join(tgtdir, filename)
                                )
        file_id+= 1
Time Series
Time series data is stored in the events endpoint of a time series object:
{your_organisation}.lizard.net/api/v4/timeseries/{timeseries_uuid}/events/.
A time series object must exist in order to upload time series data to Lizard.
To upload time series data of multiple time series at once you can use the time series event bulk import at
{your_organisation}.lizard.net/api/v4/timeseries/events/.
Requirements
The upload of time series events should consist of at least one time-value pair.
The time must be in ISO 8601 date and time representation.
The value can be a number, string or boolean, depending on the value_type of the corresponding time series object.
An example of a time-value pair is:
{"time": "2024-08-16T01:00:00Z", "value": 3.14}
Warning
An upload with duplicate times will be rejected
Upload
Timeseries data can be supplied with a POST request to the timeseries events endpoint in the API. Interaction with the API can be done from e.g. Postman or Python. User credentials should be included in the header and the data should be stored in the payload of the request.
Value based timeseries
This type of timeseries consists of integers, floats, float arrays or text. The body of the request is a JSON payload with a list of one or more time-value pairs:
[
        {"time": "2024-07-01T01:30:00Z", "value": 40.7},
        {"time": "2024-07-01T02:00:00Z", "value": 39.1}
]
File based timeseries
This type consists of images, movies or files. A single files is posted on a certain datetime, which is included in the header of the request.
An example of an upload of an image using requests in Python:
import requests
import datetime as dt

now = dt.datetime.utcnow()
uuid = ‘385c08c5-a0cf-4097-a98f-b6f053ef32c6’
url = 'https://demo.lizard.net/api/v4/timeseries/{}/events/'.format(uuid)
data = open('./x.png', 'rb').read()
res = requests.post(url=url,
                    data=data,
                    headers={
                    'Content-Type': 'image/png',
                    'datetime': now.strftime('%Y-%m-%dT%H:%M:%S.%fZ'),
                    'username': 'jane.doe',
                    'password': 'janespassword'
                    })
Assets
Assets are locations that represent a certain object, such as a measuring station or weir. They are used to visualise locations in the Lizard viewer.
Assets can be created with an API POST request on the endpoint of the object type, for example
{your_organisation}.lizard.net/api/v4/measuringstations/.
More information on asset attributes can be found in the section on Vectors.
We support asset synchronisation. This type of data feed has to be configured per customer. Changes in location names, coordinates and new locations can be seen in Lizard as soon as the following day.
Upload vectors as a shapefile
Assets can be uploaded to Lizard with shapefiles via the import form at <base-url>/import. These shapefiles contain information about assets or assets together with their nested assets (e.g. GroundwaterStations and their Filters).
A shapefile can be uploaded as a zipped archive. The zipfile should contain at least a .dbf, .shp, .sh and a .ini file. In case of nested assets, these should be found in the same shapefile record (row) as their assets. The following section provides an example of an .ini file for groundwater stations.
Assets without nested assets
An .ini file is used to map shapefile attributes to Lizard database tables, organisations and attributes. An .ini file consists of three sections:
[general]: indicates asset name to upload to and optionally organisation uuid.
[columns]: maps lizard columns to shapefile columns
[default]: optionally provide default values for columns
This example .ini creates a new asset from each record of the shapefile, with:
A code taken from the ID_1 column of the shapefile;
A name taken from the NAME column of the shapefile;
A surface_level taken from the HEIGHT column of the shapefile;
A frequency that defaults to daily;
A scale that defaults to 1, which means this asset can be seen at world scale, when the asset-layer in Lizard-nxt is configured accordingly.
Assets with nested assets
In case of nested assets another section should be added to the .ini file:
[nested]: maps lizard columns to shapefile columns, it is possible to add multiple nested assets for one asset.
A groundwater station with filters (its nested assets) would look like this:
[general]
asset_name = GroundwaterStation
nested_asset = Filter

[columns]
code = ID_1
name = NAME
surface_level = HEIGHT

[defaults]
frequency = daily
scale = 1

[nested]
first = 2_code
fields = [code, filter_bottom_level, filter_top_level, aquifer_confiment, litology]
The [nested] categories describe:
first: indicates the first column in the shapefile that maps lizard columns to shapefile columns. This column and all columns to its right configure nested assets. The number of these columns should be a multiple (the number of maximum nested assets per asset) of the fields.
fields: lizard-nxt fields. Each column in the shapefile (including the ‘first’) is mapped to these fields in order, without considering the shape column names.
This example .ini creates (a) new nested asset(s) from each record of the shapefile, with:
A link to an asset that conforms to the asset as described in the Assets without nested assets.
A code taken from the 2_code column of the shapefile. And a new nested asset with a filter_bottom_level for each 5th column from that column onwards;
A filter_bottom_level taken from the column directly next to the 2_code column of the shapefile. And a new nested asset with a filter_bottom_level for each 5th column from that column onwards;
A filter_top_level taken from the column 2 columns next to the 2_code column of the shapefile. And a new nested asset with a filter_top_level for each 5th column from that column onwards;
A aquifer_confinement taken from the column 3 columns next to the 2_code column of the shapefile. And a new nested asset with a aquifer_confinement for each 5th column from that column onwards;
A lithology taken from the column 4 columns next to the 2_code column of the shapefile and each. And a new nested asset with a lithology for each 5th column from that column onwards
You can copy paste this code in your own .ini file and zip it together with the shapefile.
Contact
If you have additional questions about the use of the API contact our servicedesk (servicedesk@nelen-schuurmans.nl)